Removing a partition from a hard drive or solid-state drive (SSD) can be a straightforward process, but it requires caution to avoid data loss. Partitions are separate sections on a storage device that can be used to organize data, install operating systems, or allocate space for specific applications. Before proceeding, it's essential to back up any valuable data stored on the partition you intend to remove, as this process will erase all data on that partition.
Understanding Partitions and Their Removal

Partitions can be primary, extended, or logical. Primary partitions can be used to boot an operating system, while extended partitions can be further divided into logical drives. Removing a partition involves deleting the partition entry from the partition table, which is a data structure that describes the partition layout on the storage device. This process can be performed using various tools, including the Disk Management utility in Windows, the diskpart command-line tool in Windows, or the fdisk and gdisk utilities in Linux.
Method 1: Using Disk Management in Windows
The Disk Management utility in Windows provides a graphical interface to manage partitions, including removing them. To remove a partition using Disk Management, follow these steps:
- Press the Windows key + R to open the Run dialog, type
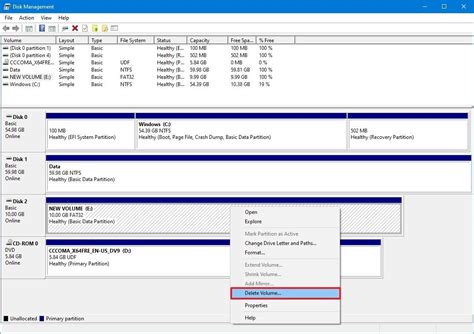
diskmgmt.msc, and press Enter. - In the Disk Management window, locate the partition you want to remove. Make sure it’s not the system partition or any partition with data you wish to keep.
- Right-click the partition and select “Delete Volume” or “Delete Partition” depending on the options available.
- Confirm the deletion to proceed. The partition will be removed, and the space will be converted to unallocated space.
Method 2: Using diskpart Command-Line Tool in Windows
The diskpart command-line tool offers more advanced options for managing partitions, including removing them. Here’s how to use it:
- Open the Command Prompt as Administrator by right-clicking the Start button and selecting “Command Prompt (Admin)” or “Windows PowerShell (Admin)” in newer versions of Windows.
- Type
diskpartand press Enter to start thediskpartutility. - Type
list diskto view a list of available disks. - Identify the disk containing the partition you want to remove and type
select disk <number>, replacing<number>with the actual disk number. - Type
list partitionto view the partitions on the selected disk. - Select the partition you want to remove by typing
select partition <number>, replacing<number>with the partition number. - Type
delete partitionto remove the partition. - Confirm the deletion when prompted.
Method 3: Using fdisk Utility in Linux
In Linux, the fdisk utility is commonly used for managing partitions. To remove a partition using fdisk, follow these steps:
- Open a terminal and type
sudo fdisk /dev/sdX, replacingsdXwith the actual device identifier of the disk containing the partition you want to remove (e.g.,sda,sdb, etc.). - Press
pto view the partition table and identify the partition number you want to delete. - Press
dto delete a partition, then enter the partition number. - Press
wto write the changes to the partition table. - Confirm the changes when prompted.
Method 4: Using gdisk Utility in Linux for GPT Disks
For disks using the GUID Partition Table (GPT) format, the gdisk utility is used. The process is similar to fdisk, with some differences in commands:
- Open a terminal and type
sudo gdisk /dev/sdX, replacingsdXwith the actual device identifier. - Press
pto display the partition table. - Press
dto delete a partition, then enter the partition number. - Press
wto save the changes. - Confirm the changes when prompted.
Method 5: Using a Third-Party Tool
Several third-party tools, such as EaseUS Partition Master, AOMEI Partition Assistant, and PartitionMagic, offer user-friendly interfaces for managing partitions, including removal. These tools often provide additional features such as resizing partitions, merging partitions, and converting between basic and dynamic disks. To use a third-party tool, follow these general steps:
- Download and install the chosen software.
- Launch the application and select the disk containing the partition you want to remove.
- Identify the partition in the software’s interface.
- Right-click the partition or select an option to delete it, depending on the software’s interface.
- Confirm the deletion when prompted.
Key Points
- Always back up important data before removing a partition to avoid data loss.
- Use built-in tools like Disk Management in Windows or `fdisk`/`gdisk` in Linux for partition management.
- Third-party partition management tools can provide additional features and ease of use.
- Be cautious when selecting the partition to delete, as deleting the wrong partition can lead to significant data loss.
- Understand the differences between primary, extended, and logical partitions to manage them effectively.
| Partition Type | Description |
|---|---|
| Primary Partition | A partition that can be used to boot an operating system. |
| Extended Partition | A partition that can be further divided into logical drives. |
| Logical Partition | A partition created within an extended partition for additional storage. |
What happens to the data on a partition when it is removed?
+When a partition is removed, all data on that partition is deleted. It’s essential to back up any important data before proceeding with partition removal.
Can a removed partition be recovered?
+Recovering a removed partition can be challenging and often requires professional data recovery services. The success of recovery depends on several factors, including the type of storage device and whether the space has been overwritten.
How do I ensure I’m deleting the correct partition?
+Always verify the partition details, including its size, location, and contents, before confirming its deletion. Using the partition’s label or identifying its mount point can help ensure you’re targeting the correct partition.