Creating a paper plane is an art that requires precision, patience, and practice. The steps involved in making a paper plane can vary depending on the design and complexity of the plane. However, here is a simple and classic design for a paper plane that can be made in a few easy steps.
Introduction to Paper Plane Basics

Before we dive into the steps, it’s essential to understand the basic components of a paper plane. A typical paper plane consists of a fuselage, wings, and a tail. The fuselage is the main body of the plane, the wings provide lift, and the tail helps with stability and direction. To make a paper plane, you will need a single sheet of paper, preferably A4 or letter-sized.
Key Points
- Start with a square or rectangular piece of paper
- Fold the paper in half to create a crease
- Make symmetrical folds to ensure even wings
- Adjust the tail for better stability and control
- Practice makes perfect, so don't be discouraged if it takes a few tries
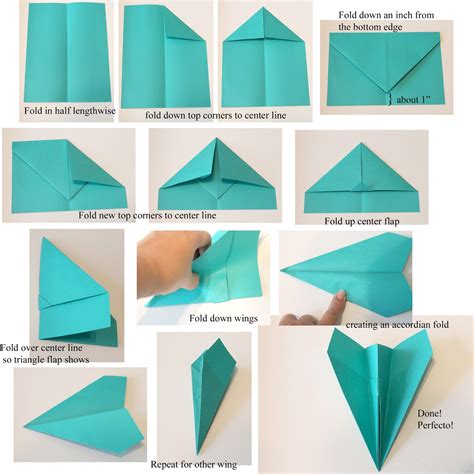
Step 1: Fold the Paper in Half
To begin, fold the paper in half lengthwise, creating a crease in the middle. This fold will help you make symmetrical folds later on. Unfold the paper and lay it flat with the crease facing upwards.
| Step | Description |
|---|---|
| 1 | Fold the paper in half lengthwise |
| 2 | Unfold the paper and lay it flat |

Step 2: Create the Wing Folds
Next, fold the top left and right corners of the paper down so that they meet the middle crease. The folds should be symmetrical and about 1 inch deep. These folds will form the wings of the plane.
Step 3: Make the Tail Fold
Fold the bottom corner of the paper up to create the tail of the plane. The tail fold should be about 0.5 inches deep and should be even with the bottom edge of the paper.
The tail fold is essential for stability and control. You can adjust the tail fold to change the direction and stability of the plane.
Step 4: Add the Nose Fold (Optional)
If you want to add a nose to your plane, fold the top edge of the paper down slightly. This will help improve the aerodynamics of the plane and give it a more pointed nose.
Why is the nose fold optional?
+The nose fold is optional because it's not essential for the plane to fly. However, it can help improve the aerodynamics and stability of the plane.
How do I adjust the tail for better stability and control?
+To adjust the tail, you can fold it up or down slightly. If the plane is diving too quickly, you can fold the tail up to reduce the dive. If the plane is not diving enough, you can fold the tail down to increase the dive.
Final Steps and Tips

Once you have made all the folds, your paper plane is ready to fly. To make it fly, gently toss it forward with a smooth, gentle motion. Make sure to throw it level and not at an angle.
Remember, practice makes perfect. Don't be discouraged if your plane doesn't fly well at first. With a little practice and patience, you can create a paper plane that flies smoothly and evenly.
In conclusion, making a paper plane is a fun and creative activity that requires precision and practice. By following these steps and tips, you can create a paper plane that flies well and brings joy to you and others.
Meta Description: Learn how to make a paper plane with our step-by-step guide. Create a classic design that flies smoothly and evenly with our expert tips and tricks.