Creating a paper aeroplane is a fun and creative activity that can be enjoyed by people of all ages. With a few simple folds, you can turn a plain piece of paper into a flying machine that can soar through the air. In this article, we will guide you through the steps of making a basic paper aeroplane, as well as provide some tips and variations to help you improve your design.
Materials Needed

To make a paper aeroplane, you will need a single piece of paper. The type of paper you use can affect the performance of your aeroplane, with thicker paper tends to be more stable and easier to fold, while thinner paper can be more agile and responsive. For a basic design, an A4 or letter-sized piece of paper is a good starting point.
Folding the Paper
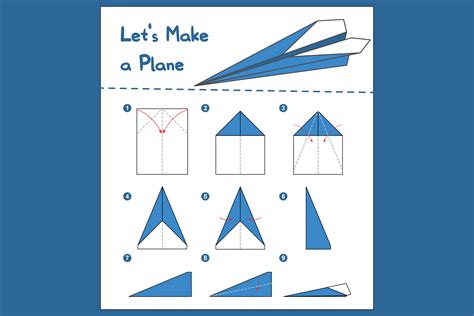
The first step in making a paper aeroplane is to fold the paper in half lengthwise, so that one long edge meets the other. This will create a crease in the paper that will help you make the subsequent folds. Next, open the paper back up and fold the top left and right corners down so that they meet the middle crease. The folds should be symmetrical and about 1-2 cm deep.
| Fold | Description |
|---|---|
| 1 | Fold the paper in half lengthwise |
| 2 | Fold the top left and right corners down |
| 3 | Fold the bottom left and right corners up |
| 4 | Fold the wings down |

Next, fold the bottom left and right corners up so that they meet the middle crease, making sure that the edges are even and the corners are sharp. Then, fold the wings down along the creases you made in the previous steps, making sure that they are even and symmetrical. The wings should be about 1-2 cm deep and should be angled slightly downwards.
Launching the Aeroplane

Once you have made the basic design, you can launch your paper aeroplane by gently throwing it forward. Make sure that the aeroplane is flat and even, and that the wings are at the same angle. You can also try launching the aeroplane from a slight height, such as a table or chair, to give it more momentum.
Variations and Tips
There are many variations and tips that you can use to improve the performance of your paper aeroplane. One simple variation is to add a small tab to the back of the aeroplane, which can help to stabilize it in flight. You can also try making the wings more curved or angled, or adding a small weight to the nose of the aeroplane to make it more stable.
Key Points
- Use a single piece of paper to make the aeroplane
- Fold the paper in half lengthwise to create a crease
- Fold the top and bottom corners down to create the wings
- Launch the aeroplane gently and evenly
- Experiment with different wing angles and designs to improve performance
By following these steps and tips, you can create a basic paper aeroplane that can fly through the air. Remember to always be gentle and patient when making and launching your aeroplane, and don't be afraid to experiment and try new things.
What type of paper is best for making a paper aeroplane?
+A thicker paper tends to be more stable and easier to fold, while thinner paper can be more agile and responsive. For a basic design, an A4 or letter-sized piece of paper is a good starting point.
How do I launch the paper aeroplane?
+Once you have made the basic design, you can launch your paper aeroplane by gently throwing it forward. Make sure that the aeroplane is flat and even, and that the wings are at the same angle.
What are some variations and tips for improving the performance of the paper aeroplane?
+There are many variations and tips that you can use to improve the performance of your paper aeroplane. One simple variation is to add a small tab to the back of the aeroplane, which can help to stabilize it in flight. You can also try making the wings more curved or angled, or adding a small weight to the nose of the aeroplane to make it more stable.
Meta description: Learn how to make a basic paper aeroplane with our step-by-step guide. Discover the best type of paper to use, how to fold the wings, and tips for improving performance.